I: Using the Wand tool
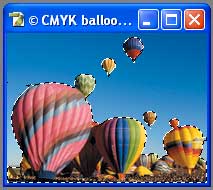
- The Wand tool is used to make a selection when the background or the area outside the selection shades of the same hue(color) or when the background completely surrounds the area that you want to select.
- The Wand tool is located in the Tool box. It is the second tool in the right hand row just below the Move Tool. The default keyboard shortcut is W.
- When the Wand tool is selected the options appear in the Options Bar at the top of the work area. The Tolerance is set in pixels ranging from 0 - 255. Enter a low value to select a few colors very similar to the pixels that you selected. Enter a high value will include a broader range of colors in the selection. Set the tolerance at 30 when selected shades of the same color as in the example of a sky background.
- Place the Wand tool on area that you want to select and Click. Notice the "marching ants" which indicates the area of pixels that are selected.
- To add to the selection, hold down the Shift key as you continue to click with the Wand tool outside the area of the marching ants. Continue to do this until all of the sky is selected.
- To select everything but the sky go to Select > Inverse. This will select the balloons and the crowd in the foreground.
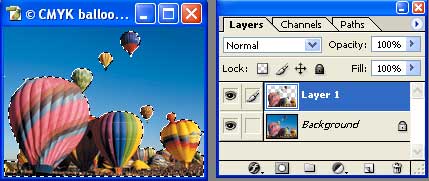
- To place the selection on a new layer, go to Edit Copy/ Edit Paste.
II: Use the Marquee Tool to Make an Individual Selection
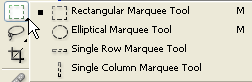
- The Marquee tool is the first tool in the upper Left corner of the Tool box. The keyboard short cut is M.
- There are four variations to the Marquee tool. The variations are found by clicking on the tiny arrow in the lower right corner of the tool. This opens the fly out window. Select the Rectangular Marquee tool if it is not already selected.
- Select the layer with the balloons. Duplicate that layer by going to the drop- down arrow and selecting Duplicate Layer from the drop-down menu. This is a precaution because you are going to alter your original selection of the balloons.
- The Layer stack should have three layers in it.
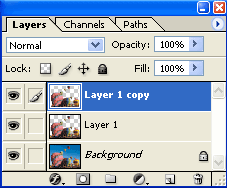
- Select the Layer 1 copy. It is selected if it is shaded blue like the illustration above.
- With the Rectangular Marquee selected, hold down the Alt key(Cntrl key = Mac) to subtract from the selection. Drag the cursor across the marching ants.
Continue to drag across the marching ants until only the red and blue balloon is selected. It is the only shape in the image that has the marching ants around it.
- To place the red and blue balloon on a separate layer, go to Edit > Copy and Edit > Paste.
- Click on the Eye located in the far left column of the Layer stack below the word "Lock". When the Eye is turned off the contents of the Layer is not visible. Make all the layers not-visible except for the layer with the red and blue balloon, which you just created.
- Select the Layer 1 copy. It is selected if it is shaded blue like the illustration above.
III: To Place the Balloon Image a Flash Animation
- In the above illustration you have selected a single balloon and placed it on a separate layer so that you can move, rotate and scale it. You can change the colors and place it anywhere within the CMYKballoon.psd file. But what if you want to place the red and balloon into a Flash animation. If you look at the balloon you see that there is a lot of extra space around it. To remove that extra space you want copy it to a new file that its just the size of the balloon.
- Go to the Select menu at the top of the screen. From the drop-down menu choose Load Selection. This will place the marching ants around the balloon.
- Go to Edit > Copy. Then go to File > New. This opens the New File dialog box.
- Notice that the dimensions for the width and height are 21 by 26 pixels. Photoshop automatically created a file the size of the balloon. If the dimensions in your dialog box are larger, this means that you have some extra pixels that you did not completely delete in the original layer. You need to go back and using the Alt key and the Rectangular Marquee tool you need to sweep the layer for any extra pixels that are not part of the balloon.
- Make sure that the Background Contents is set at: Background Color. Click OK. A tiny file, 21 by 26 pixels appears on your screen.
- Go to Edit > Paste to paste the balloon into the new file.
- Turn off the Background layer by clicking on the Eye. This puts the checkered board pattern behind the balloon in the file. The checkerboard patter indicates that the background is transparent.
- Make sure that the balloon layer is selected. Go to: File > Save for Web.
- In the Save for Web dialog box, set the Preset to PNG-24 and make sure that Transparency is checked.
- The file can now be imported into a Flash document and used in an animation. Open Flash and go to File > Import > Import to Stage. Navigate to the folder that contains the .gif image to select the image. The file appears in the upper left corner of the Flash Stage.
Copyright © 2006, Christalene Loren. All rights Reserved.