I: Using the Pen tool
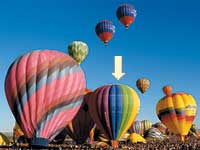
- The Pen tool is used to make a selection when it becomes necessary to draw a path around the selection in order to separate the selected area from a background that contains multiple colors and other images.
- For example, the large balloon indicated by the arrow in the picture above. The top part of the balloon is against the sky but the bottom part is in front of other balloons and a crowd of people. The only way to make this selection is to draw around the outside edge of the balloon with the Pen tool.
- First, magnify the image so that the edge of the balloon can be seen clearly. Select the Magnify tool from the tool box. It is located in the right column just above the foreground/background color squares.
- Click on the image of the balloon until you have it magnified to your choosing. To make the image smaller hold down the Alt key as you click with the Magnify tool.
- Select the Pen tool. It is located in the Tool box. It is the ninth tool down on the left column. The default keyboard shortcut is P.
- Next, make sure that the Path icon is selected. The Path icon is located in the Options bar at the top of the work area. The Pen tool is going to be used to place a path of anchor points around the edge of the balloon. ( If you do not have the Path icon selected your path will begin filling with the foreground color)
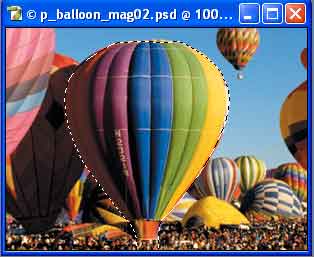
- Start in one corner, the upper right corner of the top of the balloon. Begin clicking the Pen tool along the edge of the balloon. Make as few clicks as possible. There are only nine points on the example below. When you have gone all the way around the balloon, place the Pen tool on the first point that you made. Notice the tiny"o" beside the cursor. This indicates that you are on the first point. Click to close the path.
- Notice that the lines connecting the points are not following the balloon.
- Go back to the Pen tool in the Tool box. There are four variations to the Pen tool. These are located by clicking the tiny arrow in the lower right corner of the tool icon. This opens the fly-out window. Select the Convert Points Tool.
- Click and drag a very small distance on one of the anchor points along the edge of the balloon. Doing this converts the straight line between the anchor points to a curve. The curve is adjusted by the red handles that are formed at each point that has been converted with the Convert Point Tool. Gently pull on the handles until the line conforms to the curve of the balloon. Repeat this process with each point.
- To move an anchor point use the Direct Selection Tool, which is the White Arrow just above the Pen tool in the Tool box.
- When you are satisfied with the path that has been created around the balloon, it is time to convert the path to a selection.
II: Convert A Path to a Selection
- Click on the Path tab at the top of the Layer panel. The path that has been created is called the Work Path. To Save the Work Path click on the drop-down arrow and select Save Path. I usually leave the default name as Path 1. Then click OK.
- Go back to the drop Down arrow and select Make Selection. This converts the path to the "marching ants."
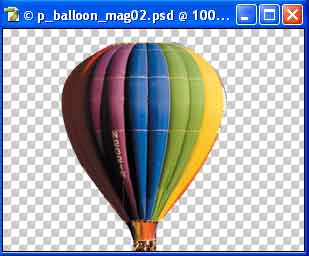
- In the Layer panel select the Layer tab. Go to Edit > Copy / Edit Paste to paste the balloon into a new layer.
- Click the Eye icon in the Background layer to turn off the layer in order to see the balloon that you have selected by using the Pen tool to create a path around the balloon.
Copyright © 2006, Christalene Loren. All rights Reserved.