I: Create the Silhouettes
- Open a photograph of where you can select two standing people from a background. (Open photo01.jpg and photo02.jpg from the Student files.)
- Select each file and Save As. Rename each file so that you have a backup copy of each file.
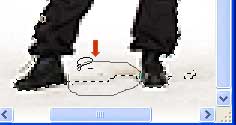
- Open photo01.jpg. Notice the dark area at the bottom of the feet. It is in both photographs. To delete it, select the Crop tool from the Toolbox. It is the third tool down in the left column.
- Click in the upper left corner of the photograph. Drag to the lower right corner just above the dark area that you want to crop and release. Four handles appear around the photograph. These handles allow you to adjust the areas that you want to crop. Everything outside the handles will be cut away. Make sure that the handles are above the dark area.
- When you are satisfied. Click the Move Tool ( first tool in the right column.) This opens the dialog box. Click on "Crop" to crop the image.
- Select the Wand tool.
- Click on the white area anywhere outside the figure. Hold down the Shift key to add to the selection. Click with the Wand tool between the legs and in the white areas under the arms. This completely selects the white background. Then go to Select > Inverse to select the reverse, which is the figure.
- Notice that there are some marching ant beyond the edge of the figure. This means that not all of the background was selected.
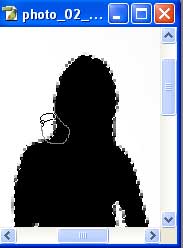
- Use the Magnify tool to zoom in closer. To remove the extra marching ants, select the Lasso tool (second tool down in the left column). Hold down the Alt key to subtract from the selection. Using the Lasso tool draw a ring around the extra "marching ants" between the legs of the figure. When you close the circle the "marching ants" will disappear. Repeat with any other marching ants outside the figure.
- When you are satisfied that you have removed all the extra background pixels, go to Edit > Copy/ Edit Paste to put the figure into a new layer.
- Select the new layer, go to Select > Load Selection. This brings back the "marching ants" indicating that the figure has been selected.
- To create a silhouette, make sure that black is the foreground color. hit the "d" key to set the default colors, which puts black as the foreground color.
- Go to Edit > Fill to fill the selected figure with black.
- While the figure is still selected ("marching ants") why not make some changes to the figure. Go to the Magnify tool to zoom in on the head and neck.
- Pick the Lasso tool again. Hold down the Alt key to subtract from the selection and draw around the neck.
- Repeat Step 15 on the other side of the neck.
- Go to Edit > Copy/ Edit > Fill to copy your revised selection to a new layer. Turn off all of the layers below it to see your revisions.
- Repeat the Steps 3 - 17 with photo01.jpg.
II: Creating the Shadow for the Silhouettes
- Go to File > New (Ctrl/Comnd N) from the menu bar to open the dialog box for a New file.
- Set the Width = 500 pixels and the Height = 700 pixels. Set the Resolution = 150 pixels/inch. Make sure that White is selected under Contents and click OK
- Choose the Move tool from the Toolbox. Copy each of the silhouettes by dragging from its layer (Layer 1) in the source image file on the new image that was just created. Close the source image files.
- Each silhouette appears on its own new layer in the new file. Go to Edit > Transform > Distort. Use the handles that appear to adjust the shape of the silhouettes. Click the Move tool to close the transformation.
- Make sure that you have selected either of the layers with the silhouettes. To put both silhouettes on the same layer, press Ctrl(Cmnd) E to merge the layers
- Make sure that the layer with both silhouettes is selected then go to the drop-down arrow in the upper right corner of the Layer panel and select Duplicate Layer from the drop-down menu. This layer will become the shadows.
- Go to Edit > Transform > Flip Vertical to flip the layer. Go to Edit >Transform > Perspective . Pull the handles outward to distort the layer. Click the Move tool to close the transformation. Use the Move tool to position the shadow beneath the figures.
- Go to Edit > Transform > Flip Vertical to flip the layer. Go to Edit >Transform > Perspective to distort the layer.
- To merge the two layers together, select either layer. Click the Link button of the other layer. Go to the drop-down arrow and select Merged Linked from the drop-down menu.
IV: Adding the Illuminated Door Layer
- Create a new layer. Name the layer "Layer 1 ". With the foreground color set to black, go to Edit > Fill to fill the layer with the color black.
- Create another new layer. Name that layer Layer 2. Select the Rectangular Marquee tool from the Toolbox. and draw a door shape in the upper-right corner of the image window. Click the Switch Foreground to Background Colors button on the Toolbox ( a tiny double arrow next to the foreground/background colors.)This button sets the foreground color to white. Then go to Edit > Fill to fill the selection with the white foreground color.
- Go to Select > Deselect to remove the selection marquee. ("marching ants")
- With Layer 2 still selected click the Add a Layer Style button at the bottom of the Layers panel.(indicated by the red arrow)
- Choose the settings in the Layer Style dialog box.
- The image should look something like the image below.
- Merge the layers. Select the Fig layer and turn on the Link for the Background layer. Go to the drop-down arrow in the upper right corner of the panel and select Merged Linked to merge the layers together.
- Make sure that the Fig layer is deselected and the visibility (Eye) is turned off. Select Layer 1 Make sure that visibility (all four Eyes) is turned on. Go to the drop-down menu and select Merge Visible.
- The Layer panel should have two layers in it. The bottom layer is the Fig layer and the top layer is Layer 1. With your cursor click and drag the Fig layer to place it on top. It should look like the illustration below.
- Click next to continue building the backlight effect.
Copyright © 2006, Christalene Loren. All rights Reserved.