I: Creating a New Movie
- Go to File > New. Click OK.
- A new file appears on the screen . It includes a blank stage, and a blank timeline.
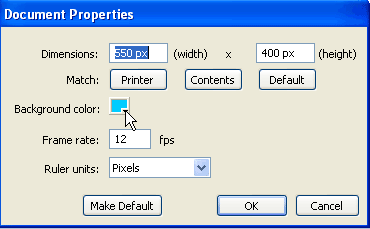
- Go to the Modify menu at the top of the screen and select Document from the drop down menu. This opens the Document Properties dialog box.
- Leave the default Dimensions at 550px x 400px.
- Set the frame rate to 12 fps.
- Make sure that the Ruler units are set for Pixels.
- Click on the Background color square to open the Color Palette. The colors in the palette are Web safe colors. Select a light blue color. Then click OK.
- Go File > Save As to save your movie. Give it a name and navigate to a respective folder to put it into.
II: Importing an Image
- See how to prepare an image in Photoshop to import into Flash.
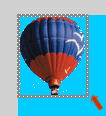
- For this exercise use balloon_select.png. Make sure that you have a copy in your student folder.
- To import an image go to File > Import > Import to Stage.
- The balloon image should appear in the upper left corner of the stage.
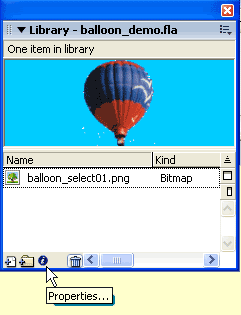
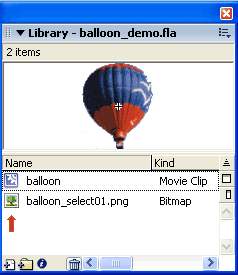
- Go to Window >Library or Ctrl L (Cmnd L=Mac) to open the Library for this movie. The Library is one of your most important tools. It contains a complete list of the images and symbols. By clicking on the icons you can open up any of the symbols to see how they are constructed.
- Click i icon at the bottom of the Library to open the Bitmap Properties dialog box.
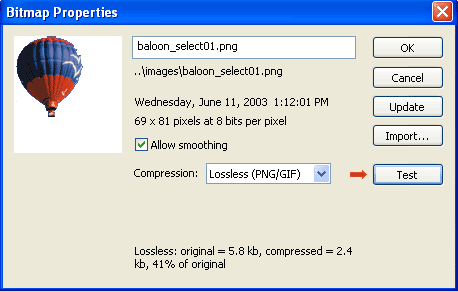
- Click the Test button to see the amount of compression that Flash uses to further compress the balloon image. Click Update then click OK.
III: Converting the Image to a Symbol
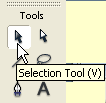
- Use the Selection tool (top left tool in Tool panel) to select the balloon on the Stage. A box appears around the image
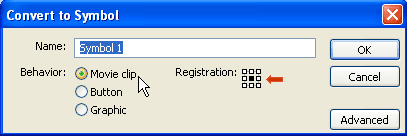
- Use F8 or Modify > Convert to Symbol to open the Convert to Symbol dialog box.
- Name the symbol "balloon". Make sure that the Movie clip is selected for the Behavior. Click the tiny center square under Registration. This puts the center point to the center of the balloon. Click OK.
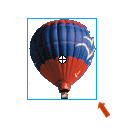
- The balloon image has now been converted to a Flash symbol. Symbols are represented in Flash by a blue box (The background has been changed to white to show the blue box better.) and the center point is indicated by a white cirlce with a black registration cross.
- The balloon symbol has been added to the Library. Notice the different icons. The tree icon represents images that have been imported into Flash. The blue gear icon represents a movie clip symbol.
- There are three types of symbols in Flash:
- Movie Clips; These are symbols that can be little movies within the main movie in Fash. Using ActionScript gives you the most controls over Mopvie Clip symbols. It is suggested that when in doubt convert your shape or image to a Movie Clip. The behavior of the symbol can be changed any time.
- Buttons; These symbols are used to control the Movie Clip symbols.
- Graphic: These symbols are used when an object is to remain inactive. A good example of a graphic symbol is a button on a Web page that indicated the that page. You want the button to indicate to the user that that is the page they are on but you want all the other buttons but that one to be active on the page.
IV: About Key Frames
- Use the Selection tool to move the balloon symbol to the lower left side of the stage.
- There is one frame in the Timeline. Flash always places the first key frame at frame 1. When the balloon is selected the frame turns black.
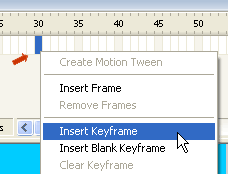
- Click on frame 30. The frame turns blue. Right click (Ctrl click=Mac) and select Insert Keyframe from the drop down menu. This places a second key frame at frame 30.
- There are now two key frames. The first is on frame 1, indicated by a black circle The second key frame on frame 30 is a white circle indicating that it is a blank key frame. No change has been made. The white rectangle on frame 29 indicated the final frame before the change.
- Using the Selection tool move the balloon to the upper right corner of the stage.
- Click on the Playback head and drag it back to frame 1. This is called "scrubbing"
- Go to the Control menu at the top of the screen and select Play from the drop-down menu. Notice that the balloon sits at the lower left corner until frame 29 then jumps to the upper right corner at frame 30. This is not very exciting.
- The frames 2 through 29 are the in-between frames. In animation these are called "tweens" The advantage to computer animation is that the computer will draw these frames.
- To create the "tween"
- Click on any frame between 1 and 30.
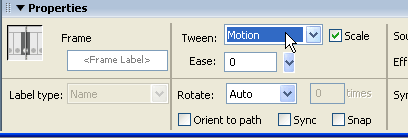
- Go to the Property Inspector at the bottom of the screen.
- From the Tweening option drop-down menu select Motion.
- Two things happen to indicate that a "tween" has been created.
- The frames turn light purple.
- An arrow appears between the span of the two key frames.
- Note: If the arrow appears broken a tween has not been created. A tween can only be created with a symbol. Check to see that you have created a symbol from the object that you are animating.
- Go to Control > Rewind/Control >Play to view the animation.
V: Scaling and Rotating the Symbol
- To create the illusion that the balloon is receding into the distance,the balloon should appear to be getting smaller.
- Click on frame 30. Go to Modify > Transform > Scale and Rotate.
- In the Scale and Rotate dialog box set the Scale at a number smaller than 50 ( I used 20). Leave the Rotate at 0. Click OK.
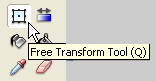
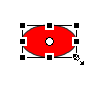
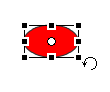
- Scaling an Rotating can also be done by using the Free Transform Tool in the Toolbar.
- When the Free Transform tool is selected handles appear around the shape on the stage. Place the cursor on one of the corner handles.
Copyright © 2006, Christalene Loren. All rights Reserved.