I: Creating an images for the Animated GIF
- Open Photoshop and go to File > New. Set the dimensions for the work area to be: width = 300, height t= 100.
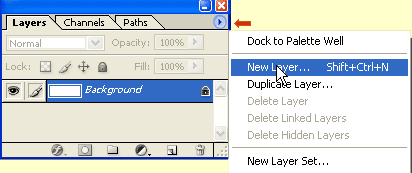
- Go to the Layer panel Click on the drop-down arrow in the upper right corner and select New Layer from the drop-down menu.
- This creates a new layer in the Layer panel .
- Select the Ellipse Marquee tool from the Tool box. You may have to click on the tiny arrow in the lower right corner of the tool to open the fly-out menu in order to select it.
- Drag the Ellipse tool across the work space creating an ellipse that almost fills the entire work space.
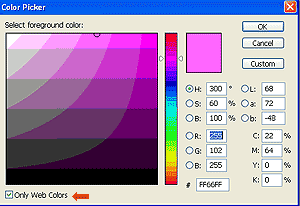
- Select a foreground color from the Color Picker. The foreground color is top square of color. (In this example it is pink.)
- When you click on the color square it will open the Color Picker.
- Make sure Only Web Colors is checked . The select from the palette or a new color from the vertical color bar.
- Once you have found a color that you like, go to Edit > Fill. Click OK for the foreground color. You should have an ellipse with your color that looks like the one below.
- Go Select > Deselect to turn off the "marching ants" and deselect the ellipse that you created.
- Go to the Tool box and choose the Move tool. Click on the ellipse and position it so that it is in the center of the work space.
- You have created the first image for the animated GIF illustrated at the bottom of this page.
II: Duplicating and Scaling the images for the Animated GIF
- The next step is to duplicate the ellipse on separate layers and to scale each ellipse so that as the animation plays the ellipse appears to be getting larger.
- Maker sure that the Ellipse layer is selected. It should be shaded blue. Go to the Layer panel and click on the drop-down arrow in the upper right corner. Select Duplicate Layer. Change the name to "Ellipse02" and click OK.
- Click on Layer1 to select it and double-click on the name "Layer 1" This allow you to change the name of the layer. Type in "Ellipse01". Then turn off the layer by clicking on the Eye to turn it off. The only thing visible is the duplicate layer "Ellipse02"
- Select the layer named "Ellipse02". It should be shaded blue.
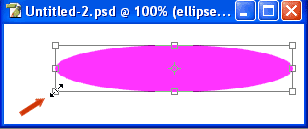
- Go to Edit > Transform > Scale. Four handles appear around the ellipse. If you place the cursor on one of the corner handles it turns into a double arrow.
- While holding down the Shift key, drag the cursor from the corner handle to the center of the ellipse in order to make the ellipse smaller. Do not scale down too much. This is the second ellipse in the animation so it should not be that much smaller.
- To complete the transform process, select the Move tool . In the transformation dialog window, Click Apply.
- With the Move tool selected, position Ellipse02 in the center of the layer. Click the Eye for the layer named Ellipse01 to turn if on and off test if the ellipses are lined up.
- Repeat Steps 4 through 8 making each duplicated ellipse increasingly smaller. Remember to turn off all the layers except the background layer and layer you are working on. Name each ellipse with a consecutive number.
- To put some text in the animation, select the Text tool from the Toolbox.
- Select a color for the text from the Text Color in the Options bar at the top of the screen.
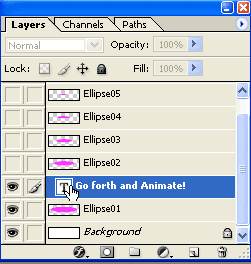
- Type your text message on top of the ellipse. Notice that a new layer has been created. It is a special layer called a text layer. It is indicted by a "T".
- If you need to change your message, double click on the "T" of the text layer. This will highlight the text in green and allow you to make any changes. Select the font, font size, font style and alignment from the Option bar at the top of the screen. Click on the Move tool to deactivate the text layer.
- If you want to change the color of the background, select the background layer (blue shaded). Select a color by clicking on the foreground color Picker to open the color palette. Click on a color. Click OK. Next go to Edit > Fill. This should fill the background layer with your selected color. ( I chose to leave my background transparent so I turned off the Eye in the background layer.)
- When you are done, your Layer panel and ellipse should something like the example above. Save your work.
III: Creating the Animation Frames from the Photoshop Layers
- The next step is to launch ImageReady and to convert your layers to the frames of your animated GIF.
- To launch ImageReady from Photoshop use Shift Ctrl M or click on the bottom button in the Tool box.
- Begin by turning off all of the layers except the background layer. If you want the background to be transparent then turn the background layer off also.
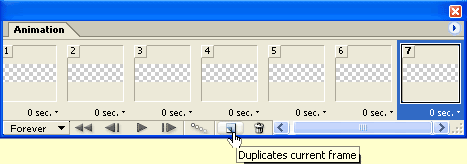
- The Animation panel, shows the first frame. Since all the layers including the background layer are turned off, all that you see is the checker boarding which indicates that the first frame is transparent.
- Click the Duplicate Current Frame button at the bottom of the panel to add the number of frames to your animation. It is easier to start with a blank frame or a frame with only the background layer turned on. Add as many frames as necessary. (This animation has six layers plus a text layer and I want a layer where nothing is showing so that means I need eight frames.) If you make a mistake select the layer and click on the Thrash Can at bottom of the panel
- If you want to have a space between the cycles of the animation, leave the first frame blank. Select the second frame and turn on the layer named "Ellipse06".
- Go to frame 3. Make sure that Ellipse06 is turned off and turn on Ellipse05.
Go to frame 4. Make sure that Ellipse 05 is turned off and turn on Ellipse04.
Go to frame5. Make sure that Ellipse 04 is turned off and turn on Ellipse03.
Go to frame6. Make sure that Ellipse 03 is turned off and turn on Ellipse 02.
Go to frame 7. Make sure that Ellipse 02 is turned off and turn on Ellipse 01.
At frame 8 turn on Ellipse 01 and the Text layer.To play the animation click on the Play button at the bottom of the panel. Notice that the animation rushes through. You can barely read the text.
To set the timing or the length of time that the frame is seen, click on the tiny arrow in the lower right corner of the fame. This open a fly-out menu. A good place to start is to set each frame at 0.2.
- Frames that contain text should have the timing set long enough for the user to be able to read the text. ( I set the timing at 1.5sec.) To set a custom number select "Other" from the fly-out menu type in your own value in the dialog box.
- This animated GIF contains a blank frame at the beginning of the cycle. The purpose of this frame is to create break between the cycles of the animation. A good value to set for this type of frame is 3.0 sec. Keep in mind that all these numbers are relative. Test your work and choose the values that work best for your animation. One last point about timing. Browsers play the animation at a slower rate. So test your Animated GIF in your browser and test it online.
- Now that you have created an Animated GIF you need to save your work.
IV: Saving an Animated GIF
- You need to save your work twice.
- Go to File > Save and save your .psd (Photoshop) file. This is important if you ever want to edit the file.
- Next Go to Save Optimized As. Notice that the file ending is .gif. This is your Animated GIF. This is the file that you want to upload on to the Internet.
Copyright © 2006, Christalene Loren. All rights Reserved.
