I: Adjusting the Animation to Add the Title Page and the Button
- Buttons allow the user to interact with an animation by providing the choice when to play or stop the animation.
- The easiest way to create a button for an animation is to create a title page and put the button on the title page. The user clicks the button to play the movie.
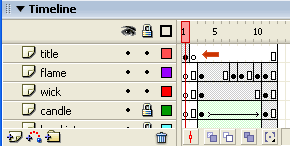
- To make room for the extra frame(s) in front of the beginning of the animation all the frames of the animation need to be moved back down the timeline.
- To select and move all of the frames in the Timeline to frame 3:
- Place the cursor one the first frame of the top most layer and drag diagonally down to the last frame of the bottom most layer. The black shaded area indicates that the frames are selected. Be very careful not to move the key frames.
- Click down with the cursor. A gray shaded area appears around the black selected frames.
- Drag all the frames to frame 3.
- Click outside the selected frames to deselect.
- Next Create a new layer. Name it Title. Place the cursor on frame 1 of the title layer. On the blank screen create your title page.
- Go to frame 2 of the "title" layer and use F7 to create a new blank key frame, which will prevent the title layer from showing up in the movie once the movie begins to play.
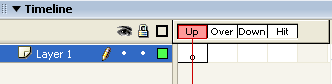
- To create the navigational button go to Insert > New Symbol. For the Behavior, select Button. Name the button Start. This opens the Button Editor. Notice that the Timeline is different. It consists of 4 frames or states of the button
- The frame labled Up is the state of the button when it is sitting on the stages or Web page.
- The frame labeled Over is the state of the button when the user rolls over the button. The button can change color, size or shape to indicate to the user that it is a navigational element.
- The frame labeled Down is the state of the button when the user clicks down on the button with the cursor.
- The frame labeled Hit is the state of the button that is active. The user does not see the Hit state. As the cursor rolls over that area it is turned into a hand icon indicating that the area is an active navigational area.
II: How to Create Frames for the Button
- Select the Up frame. Select the Oval or Rectangular tool. Select a color and drag the tool out to create a shape.
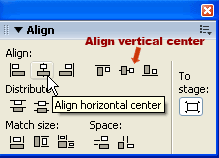
- Use the Ctrl key K to open the Alignment Panel. Make sure the oval shape is selected. Make sure the To Stage button is activated. Click both the Align horizontal center and the Align vertical center buttons to put the oval shape in the center of the cross hairs on the stage.
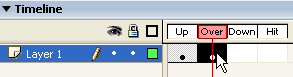
- Place the cursor in the frame that is the Over state and select F6, which copies the Up frame to Over frame.
- With the the Over frame selected, go to the Fill Color button and select another color to fill the oval shape with the new color.
- Place the cursor in the frame that is labeled Down and select F6 which copies the previous frame to the Down frame. Go to the fill color and select another color to change the color of the oval in this frame.
- Place the cursor in the frame labeled Hit and select F6. Keep the same fill color. Use the Free transform tool to make it a little bigger. This is especially important if you have small buttons. The Hit area is the only active area of the button and if it is too small the user will have difficulty activating it.
- To Add a Label to the Button
- Create a new layer. Name it Text. Put the cursor in the first frame(Up).
- Anywhere on the screen type "start" or the some text that indicates what the button does.
- Use Ctrl K to open the Alignment Panel and select both the horizontal and vertical Align Center button to place the text on top of the button.
- Click on the To Stage button to return to the main stage.
- Create a new layer and name it button. Use Ctrl L (Window > Library) to open the Library panel. Select the button in the panel and drag it on to the stage.
III: Adding the Script to the Frames of the Movie
- Go to frame 2 of the Button layer. Use F7 to create a New Blank Key frame to prevent the button from showing up when the movie begins to play.
- Create a new layer and name it Actions. Make this layer the top layer in your animation. Select frame 1 of the Actions layer.
- Open the Actions panel and go to Actions > Global Functions > Timeline Control. Scroll down to the "stop" action. Double click to put the action into the Actions panel on the right side.
- The panel should read:
- This action keeps the play head from playing the movie and holds the movie on frame 1 until the user clicks the button.
- Go to the last frame of the movie on the Timeline. Select that frame in the Actions layer. Use F7 to create a new Blank Key frame.
- Select the gotoAndStop option from the left side of the Actions panel. Double click to put it in the right side of the Actions panel. This action needs to be modified. To modify: type on the right side of the Actions panel so that the script reads:
- This action at the end of the animation forces the Playhead to go back to the first frame, which is the title frame, and to stop.
IV: Adding the Script to the Button
- Script are applied to both frames in an animation and objects such as movie clips and buttons. So far we have applied a script to the first and the last frame of the animation. Next we need to apply a script to the button so that when the user clicks the button it will work.
- Go back to frame 1 of the animation. Select the button directly on the stage. Make sure that a blue box is around the button to indicate that it is selected.
- Open the Actions panel is it is not already open and. On the right side of the panel type exactly the following script:
V: Troubleshooting the Script
- If the above script has been place on the frame instead of the button you will get an error message or the button will fail to launch the movie. Click on the button with the Actions panel open to see that the script is on the button.
- The button will show up in the animation if you fail to use F7 to create a blank key frame in frame 2 of the button layer. The new blank key frame will hold the button at frame 1.
- The title will show up in the animation if you fail to use F7 to create a blank key frame in frame 2 of the title layer. The new blank key frame will hold the title image at frame 1.
Copyright © 2006, Christalene Loren. All rights Reserved.